TLS encryption (HTTPS)
We offer free TLS certificates to everyone, provided by Let's Encrypt. HTTPS stands for Hyper Text Transfer Protocol over SSL and is the secure alternative to HTTP. Nowadays we usually talk about SSL's successor: 'TLS', which is more secure and still maintained. TLS has 2 main features:
-
Authentication: You need be able to trust that the server you are connecting is authentic.
-
Encryption: The encryption TLS provides makes sure you and the server you are connected to are the only ones to know what you are communicating about.
You can turn on Let's Encrypt TLS for your own domain by login in as an administrator in our Service Centre. Go to Hosting > TLS Encryption and turn on TLS for your preferred (sub)domain.
Contents
Enabling TLS for an existing website
Via the Service Centre you can easily turn on Let's Encrypt TLS certificates for several (sub)domains.
Enabling TLS
If your sub domains are configured correctly, within the Service Centre, go to Hosting > TLS Settings. Select 'TLS Enabled' for the desired (sub)domain.
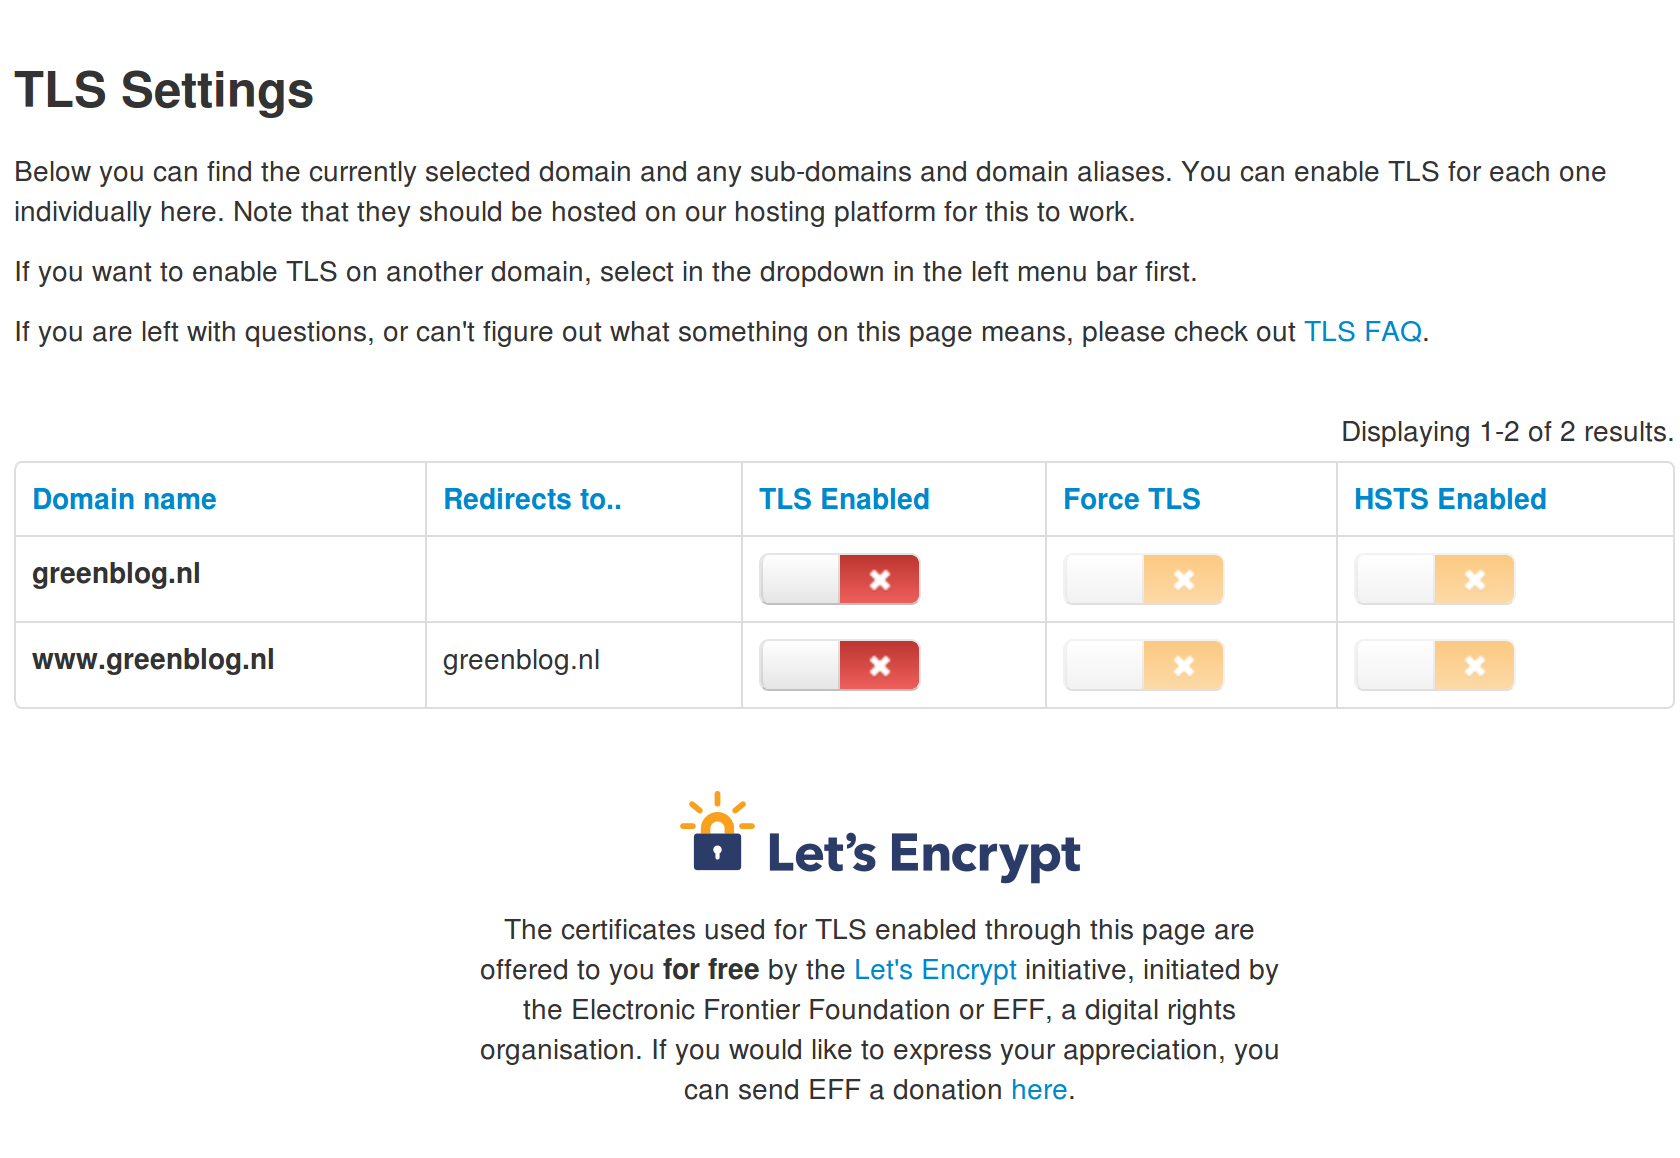
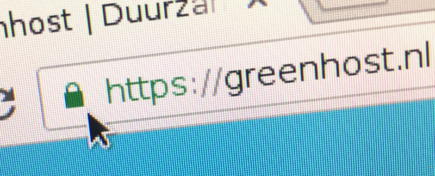
Next, check your website via https:// (for instance https://greenblog.nl) and check if your website is working correctly. Check if you can see a green lock in the address bar: this shows you that the connection with your website is is encrypted and secure.
If not everything is configured correctly, you may not see a lock at all, or an orange lock, or a lock with a warning triangle. This means that part of your website is not transferred via TLS. Images from an external source are not automatically sent through the TLS-connection when there is 'http://' in the link to the image. It is possible that you don't see a green lock because external images are sent over an insecure connection. Click on the icon to the left of the URL in the address bar to see which part of the website is not yet send securely.
Is everything working fine? Then we can force the https connection.
Forcing TLS
After thoroughly testing your website with TLS enabled, go back to the Cosmos Service Centre, Hosting > TLS Settings and turn on 'Force TLS' for the (sub)domain you tested. All the visitors of your website will use the TLS connection automatically from now on.
Important: If you have a WordPress site, you should now edit your site settings in wp-admin to change the 'Wordpress address' and the 'Site address' from 'http://…' to 'https://…'
HSTS Strict Transport Security
Configuring HTTP Strict Transport Security (HSTS) tells your browser that the website will always have a secure connection via TLS available. And that it should refuse to connect to the website if a TLS connection isn't possible.
Any browser that has seen that HSTS was enabled will remember this for at least 6 months. Note that this means that you need to keep TLS enabled for at least 6 months if you even want to disable HSTS and TLS. Please test that all the features of your website work well with TLS enabled, before you enable HSTS.
From GlobalSign SSL to Let's Encrypt
Below are the steps you need to take to change from an SSL certificate to a TLS certificate of Let's Encrypt.
Read all steps first so that you know what to do and you are always prepared for the next step. Please note, the website will be offline for some minutes during this process.
Modifying the A record
- Login to the Service Centre, select the domain on which you want to setup Let's Encrypt TLS
- Go to Hosting > DNS Records.
- Look at the current TTL (Time To Live) value of the domain, this is the time duration in seconds that the record can be cached in name servers of internet providers. If no value is entered, the default is 3600 (1 hour).
- At the A record of the (sub)domain that we are modifying, edit the TTL to 60.
- Before going to the next step, wait for the time period that the TTL was set at step 3.
Editing the IP address
- Go to the Service Centre again, select the particular domain
- Go to Hosting > DNS Records
- Make a note of the current IP address at the A record that we will modify and keep it.
- Change the destination of the particular A record to the IP address of the hosting package. This IP address can be found above the DNS settings table. Your website is now temporarily offline. Execute the following steps as soon as possible after the previous steps.
Enable TLS Let's Encrypt
- In the Service Centre go to Hosting > TLS Instellingen.
- Enable TLS for the desired (sub)domain by turning on the 'TLS Enabled' button.
- Check that your website is online via an https:// connection
- If your website is visible again, you can force TLS by clicking on 'Force TLS'. 5. Check that your website is forcing TLS by entering the http:// address which should then change immediately to https://
- Send an email to support from the email address that we know with a request in it to cancel the SSL certificate per the first date possible. If something goes wrong at step 2, 3 or 4 and the site is not (via https) available, modify the A record back to the original IP address configuration. Within a few minutes the old configuration should work again. Notify the helpdesk of the problem.