Managing e-mail accounts
Within the Service Centre you can manage e-mail accounts connected to your hosting package on the 'Hosting' tab. This overview shows different possibilities. Before making any changes, make sure to select the right domain name from the drop down menu in the upper left-hand pane.
Contents
- Managing e-mail accounts
- E-mail forwards
- Out of Office and Spam Filter configuration
- Turning e-mail functionality off
Managing e-mail accounts
To create, manage and remove e-mail accounts, log into the Service Centre with your administrator account. Select 'Mailbox/Users' in the left-hand pane.
Note: When you want to change settings for an individual mailbox (such as setting an Out of Office reply, tune spam filter settings, or manage individual forwards) this can be done in our webmail when logged in with the concerning e-mail address.
Manage an existing e-mail account
To change the settings or change the password of an e-mail account, first click the pencil icon left to the respective e-mail address within the 'Overview' tab. Then make the change and click the save button.
Note: You may be required to fill in your own administrator password again to make changes to e.g. your user's password.
Create an e-mail account
Under the 'Overview' tab you can see all existing e-mail accounts for the selected domain name. To create a new e-mail account click the blue button '+Add User…' or navigate to the tab 'New user/e-mailbox', fill in the details, and click 'Create'.
Other settings, like setting an Out of Office reply, can be done in the webmail environment.
On creating the account you will need to fill out the following details:
Username
As the username fill in the part that should come before the @. If you want to create the e-mail address 'example@yourdomain.com', fill in 'example'.
Full name
The full name is currently only in use for admin users, and will be shown on top when logged in to the Service Centre.
When you want to set the name the receiver sees when you send an e-mail using webmail, you can configure the display name in the webmail.
New password
Fill in the password for the account you are creating, or set a new password for an account that already exists. The password should be at least 8 characters long, but we advise to use longer passwords. The longer your password is, the less likely it is that you're e-mail account will be hacked. We advise to use randomized passwords in combination with a password manager.
The (new) mail account holder can change the password through our Webmail client.
Remove an existing e-mail account
You can remove an e-mail account altogether by clicking the bin icon situated left of the e-mail address within the 'Overview' tab. Be aware that this will also lead to deletion of the e-mails in that account.
Some accounts, such as the administrator account, cannot be deleted (as you will need it to log into the Service Centre).
E-mail forwards
'E-mail forwarding' means that your incoming e-mails will automatically be delivered to another e-mail address. This can be done if you want to forward to another e-mail address using the same domain name.
Although it is technically possible, we advise against forwarding to external addresses (such as Google or Microsoft addresses). Since usage of SPF checks is increased, it is very likely for e-mails forwarded in this way to be refused by the ultimately receiving servers.
Aliases and advanced e-mail forwards
To create, manage and remove e-mail forwards and aliases, log into the Service Centre as administrator. Under the 'Hosting' tab click 'E-mail Forwards' in the menu on the left.
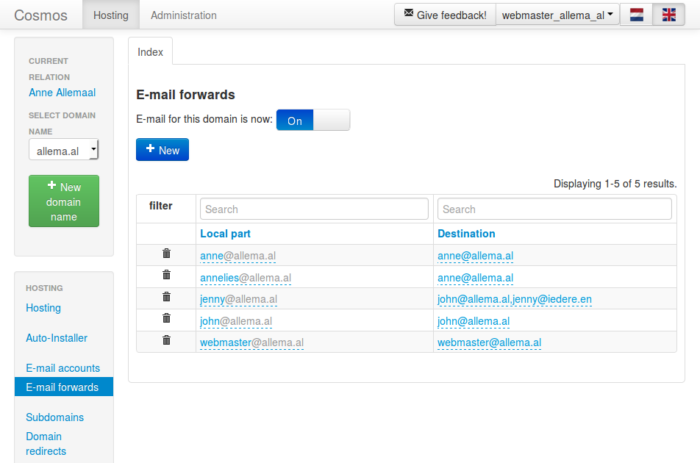
Add an e-mail alias or forward
To add a new e-mail alias or a forward, click the blue '+New' button. In the window that appears, fill in:
- The part of the e-mail address before the '@'. This is either an alias or an existing mailbox of which the e-mails will be redirected.
- The destination. You can fill in a local or external e-mail address. You can easily select a local e-mail address when clicking the button with the envelope icon. Click the '+' button on the right to add another destination and make sure the message is delivered to multiple mailboxes.
When you are done, click 'Create'.
Manage an existing alias or forward
To change an existing e-mail alias or forward select the field which you would like to change. The changes that can be made are the same as when adding a new e-mail alias or forward.
To remove an e-mail alias or forward altogether you can click the bin icon left of the e-mail alias or forward. You can only remove e-mail forwards that you added. Note that if an e-mail forward was in place, and you want to start receiving e-mails in the mentioned inbox, you will need to create that mailbox under "Mailbox/Users".
Out of Office and Spam Filter configuration
E-mail users can set an Out of Office reply and fine-tune their spam filter through webmail.
Turning e-mail functionality off
E-mail is turned on by default. If you don't want to use e-mail through us, and want to avoid confusion, you can turn off e-mail support for the selected domain name by using the slide at the top of the 'E-mail Settings' page.