Service Centre
At Greenhost you can use the Service Centre for many of the actions associated with the management of your account. Depending on what services you are subscribed to you can manage your VPSes or hosting package, change DNS records, manage email adresses and databases, view your invoices and more.
Contents
- Logging in
- Hosting overview
- Administration
Logging in
To administer your website settings you must login as administrator. This is the account that was created when you signed up with Greenhost. The Service Centre can be found at service.greenhost.net.
Once you have logged in as administrator, you will see the landing page of the Service Centre. Here you can find an overview of your data, invoices and statistics.
Login as an e-mail user
When you have an e-mail address which is created at Greenhost, you can also use this e-mail address to login in to the Service Centre. Once you have logged in you can:
- adjust the settings of your e-mail address,
- make changes to your password,
- use spam filter and Out-of-Office
Hosting overview
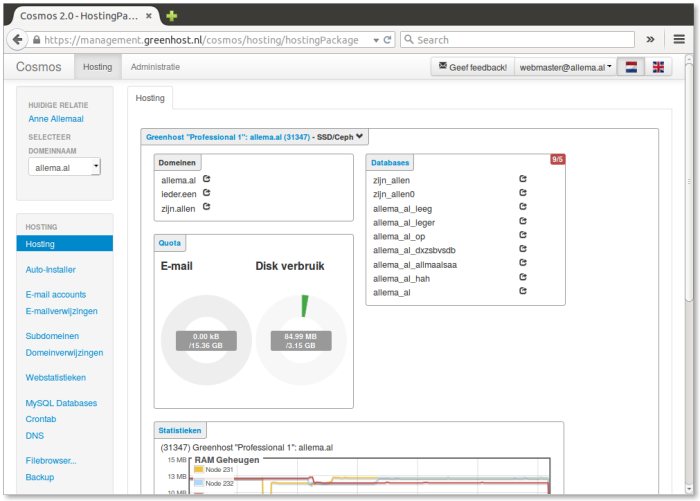
When logged in to your administrator account in the Service Centre, behind the 'Hosting' tab, you have access to the different e-mail and hosting features. You can configure your e-mail, view statistics and use several hosting features and settings, like the auto-installer, MySQL databases, back-ups, DNS records and server logs. See below for a list of hosting features in the Service Centre. The hosting features are listed in the menu in the bottom left-hand pane within the Cosmos Service Centre.
Status
Hosting Dashboard
The 'Hosting' overview shows the general usage of the disk and e-mail in a pie chart. The e-mail usage is divided per e-mail account.
Web statistics
All domains and subdomains are listed along with the possibility to view statistics for each of them. To view the statistics, click the blue button 'See statistics…'. Here you can also turn statistics on or off per (sub)domain. When entering the statistics for a certain (sub)domain you will see many different categories of user statistics, such as the number of visits per month, day and hour and the origin of the visitors. You can also see which keywords in search engines your site was found through and the number of visits per page.
Logs
At the domain level you can view and download error messages from the Apache logs of your hosting environment. These error messages can for example be used by a web developer to trace PHP programming mistakes and other issues with the configuration of your website.
Mailbox/Users
You can add and manage e-mail addresses for the domains within your hosting package. Here you can find the manual about how to manage the e-mail accounts and e-mail forwards.
Package settings
Management
Under tab 'Server settings' you can find the options to adjust the following:
- The PHP version
- Compatibility mode for WordPress and other CMS updates
- Restart the hosting package to process adjustments to your hosting package more quickly
- Repair permissions, to put the rights back to default
- Flush OpCode Cache will make sure all the files are readable and compiled
- Recalculate e-mail usage will recalculate your current e-mail quota
You can find more information about managing your server in the manual about Hosting management.
Under the tab 'Server statistics' the live statistics are shown for the package connected to the selected domain name. You can select your preferred domain name with the drop down menu on the left.
WordPress Installer
The WordPress Installer in the Service Centre lets you easily install WordPress on a domain name in your hosting package. You can find more information about the steps you need to take in our manual about the Wordpress Installer
MySQL Databases & Database backups
Under the tab 'Overview' you find all the MySQL database within your hosting package. By selecting 'New database' it is possible to create a new database. The selected domain name will decide the name of the new database. To make specific adjustments to the MySQL database you can login into the database 'PHPmyAdmin' environments by using the blue 'Log in' button. The database name and username are automatically generated and cannot be changed. The password of the database can be adjusted by clicking on 'Regenerate'.
Under the tab 'Backups' you can find the backups of all your databases. The databases are backups every 24 hours in the first 10 days. After that the backups are saved with bigger intervals up until a month old. Read more about the backups of the database in our backups manual.
Scheduled Tasks (Crontab)
Here you can set crontab files to automate certain commands. These commands will be executed in your virtual server environment at specific times. This can be useful for automating parts of maintenance of your website, set a periodic mailing and the like.
Domain settings
TLS Encryption
Here you can install TLS Encryption on your (sub)domain. By installing this certificate you will get https:// in front of your domain and with this your domains is secured against domain spoofing. Please read our extended manuals on how to turn on the TLS certificate for your new and existing website.
Subdomains
A subdomain is a domain which is part of the primary domain name, separated by a dot. (for instance test.example.org). The most famous subdomain is 'www,' which is always created automatically when you register a domain. Via the button 'Add subdomain…' you can create a new subdomain. In this manual you can find more information on how to create a new sub domain.
Domain Redirects
With a domain redirect you can forward visitors of your currently selected domain to another domain. This can be useful when you own multiple domains and want visitors of the different domains to automatically be redirected to the domain where your website is running. Find more information about creating a domain redirect here.
By default you can find redirect from the sub domain 'www' to the '@' (root) at the 'Domain Redirects' tab. This is here to support the CNAME references in the DNS record. This domain redirect is created automatically when an domain is ordered at Greenhost.
DNS Records & Name servers
The DNS records and Name Servers can be customised. The DNS (Domain Name System) makes it possible for a domain name to be converted to an IP address. In the 'Type' and 'Destination' columns you can also see the MX records are used to point to the mail servers. Under the 'Nameservers' tab the name servers which are listed show the specific name servers at the hosting provider where the DNS records are active. By default, Greenhost configures the DNS records and name servers when a new domain is being registered. More information on changing domain settings can be found on this page.
File access
SSH Keys
A list of SSH keys to gain SFTP-access is shown. With the 'Add SSH key' button you can add a new SSH key to a specific hosting package. You can read more about Shell access via our manual about Secure Shell access (SSH).
Backups
Greenhost backs up all sites hosted on our Shared Hosting platform. You can download the file server and database backups here. Read further in our manual about backups.
File management
This menu item links you through to the file management manuals on our online helpdesk. There we recommend certain FTP clients which you can use to log into the file server to put your website files in place or manage your website files. Advanced users can also use an SSH connection to manage files on the file server.
Administration
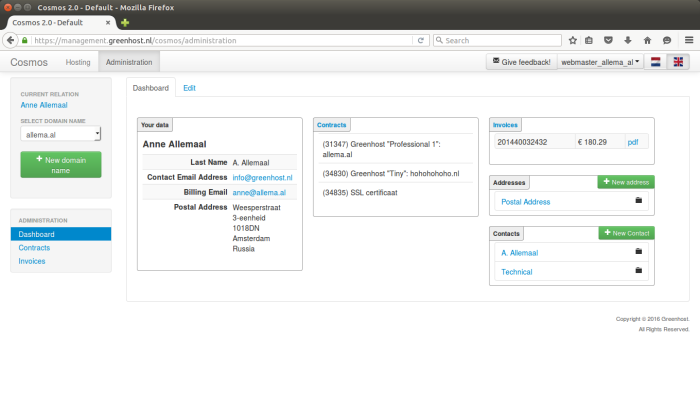
Administration Dashboard
Under the 'Administration' tab you will find the Dashboard with an overview of 'Your data', 'Addresses', 'Contacts', 'Contacts' and 'Invoices'.
Edit relation
In the Administration Dashboard you can check if all your contact details are up to date. Go to the tab 'Edit' to change any of the contact details. Here you can also add an extra relation or address to the account. You can also contact our help desk in case you need any assistance with this.
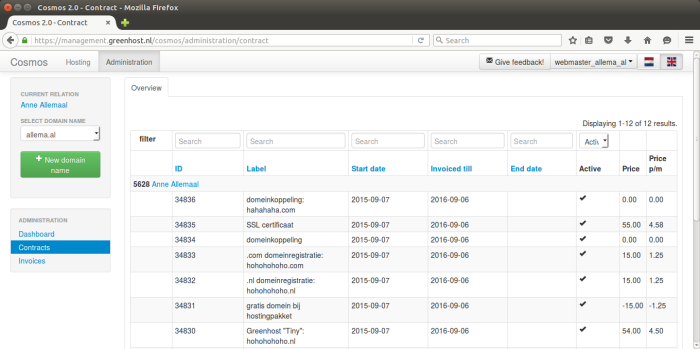
Contracts
At 'Contracts' you can find a complete list of the services you have purchased or used. Use the drop-down menu on the right to switch between 'Active', 'Inactive' and 'Both' to find all the contracts.
The overview is divided into the following columns:
- 'Contract number' shows the contract number and gives access to the contract view;
- 'Product name' shows the respective domain or hosting package;
- 'Start date' tells the starting date of the contract;
- 'Invoiced till' shows the date until which you have received invoices for the respective amount. New invoices (for contract renewal) are sent at least one month before this date;
- 'End date' shows the date on which the contract ends. An empty field means that the contract will be renewed automatically;
- 'Price' are the costs for the contract per year;
- 'Price p/m' are the costs for the contract per month;
Clicking the contract number or the 'View' icon in the first column will get you to the contract view, where you can view the contract details and change or terminate the contract if applicable.
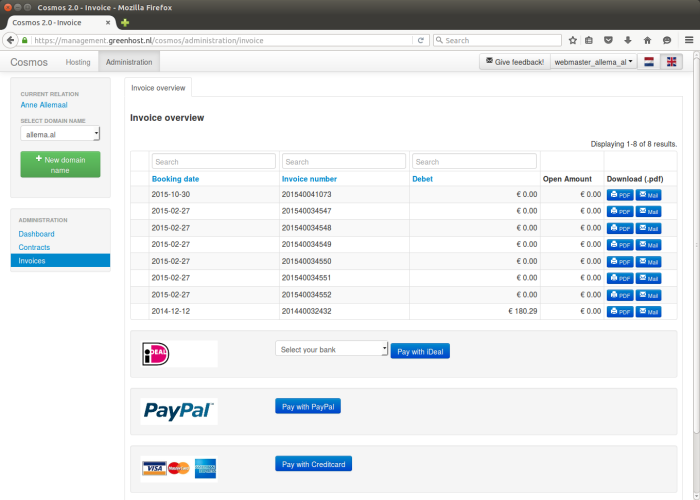
Invoices
Here you can find an overview of all the invoices. The overview is divided into the following columns:
- 'Booking date' is the day the invoice was created;
- 'Invoice number' is the unique number of the invoice;
- 'Debit' the amount that already has been paid;
- 'Open Amount' the amount that still needs to be paid. This can also be a negative amount and in that case its a credit invoice;
- 'Download' here you can download invoices via PDF' or send them to a specific email address via 'Mail';
There you can also find the option to pay for the outstanding invoices directly. Select the invoice(s) you want to pay for and select the preferred payment method in the column below.